
March 21, 2024
•Last updated March 21, 2024
Deploy a Rails App with Dokku
This step-by-step tutorial will teach you how to create and deploy a new Rails app on a remote server using Dokku.
Whether you're a developer looking to test your app or just curious about Dokku's capabilities, this tutorial will guide you through the process.
We'll cover everything from setting up the app locally, configuring the remote environment, and resolving potential deployment errors.
By the end, you'll have a fully deployed app accessible via the server's IP address.
What is Dokku?
Dokku is a simple, open-source Platform as a Service (PaaS) that allows you to deploy and manage applications on a remote server quickly. It is often called a "mini-Heroku" as it provides a similar experience to Heroku but can be self-hosted on your infrastructure.
With Dokku, you can deploy applications using a simple Git push command. It automatically builds and deploys your code to the remote server. It supports multiple programming languages and frameworks, including Ruby on Rails, Python, Node.js, and more.
Dokku also provides a web-based dashboard for managing your applications, scaling them up or down, and monitoring their resources. It integrates with popular tools like Let's Encrypt for SSL certificates and databases like PostgreSQL and MySQL.
Overall, Dokku simplifies deploying and managing applications on a remote server, making it a convenient choice for developers and small teams who want a lightweight and self-hosted PaaS solution.
Getting started
Create a new app
rails new dokku_demo -c tailwind -j esbuild
I'll generate a simple Post scaffold to demonstrate it works in production.
rails g scaffold Post title:string content:text
Let's adjust the root path to be posts#index.
# config/routes.rb
Rails.application.routes.draw do
  get 'static/dokku'
  # Define your application routes per the DSL in https://guides.rubyonrails.org/routing.html

  # Reveal health status on /up that returns 200 if the app boots with no exceptions, otherwise 500.
  # Can be used by load balancers and uptime monitors to verify that the app is live.
  get "up" => "rails/health#show", as: :rails_health_check

  # Defines the root path route ("/")
  root "posts#index"
end
Commit your changes to git locally.
git add .
git commit -m "Init"
Installing Dokku on a remote server
I’ll make use of Digital Ocean. Conveniently, Digital Ocean has a one-click install. It’s about $8/mo for the server that I used. The Dokku docs recommend a 1GB of system member on the server. You could go with the $6/mo version to start and scale up. Since this is a demo app, I'll start with the recommendation.
If you want to use another host, they might have an easy install option, or you can easily SSH into the server and install Dokku directly. Check out the docs for how to do that.
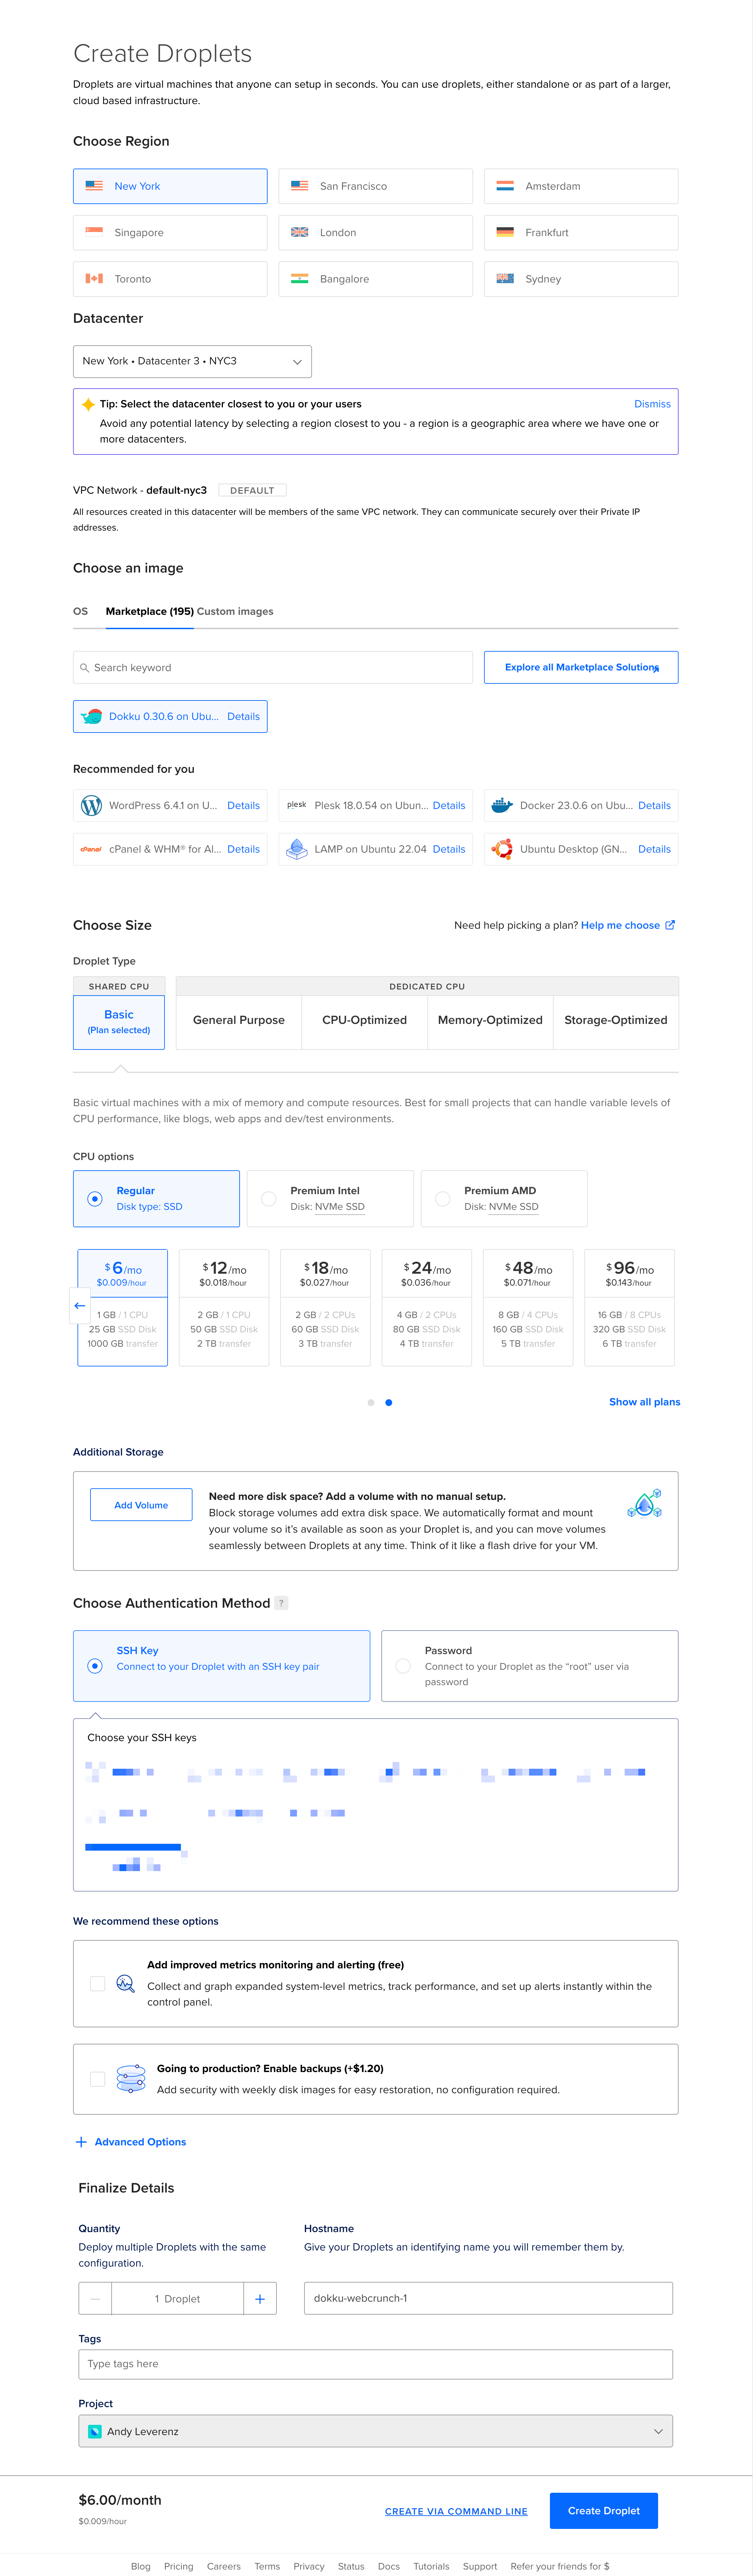
Visit the Dokku app page on the Digital Ocean marketplace. Click the “Create Dokku Droplet” button (Ideally when already signed up and logged in with Digital Ocean).
You’ll be directed to a Droplet creation wizard that should give you some presets. Don’t use the default size. Use a basic setting to go down to the cheaper $8/mo option.
Here’s a screenshot of my account:
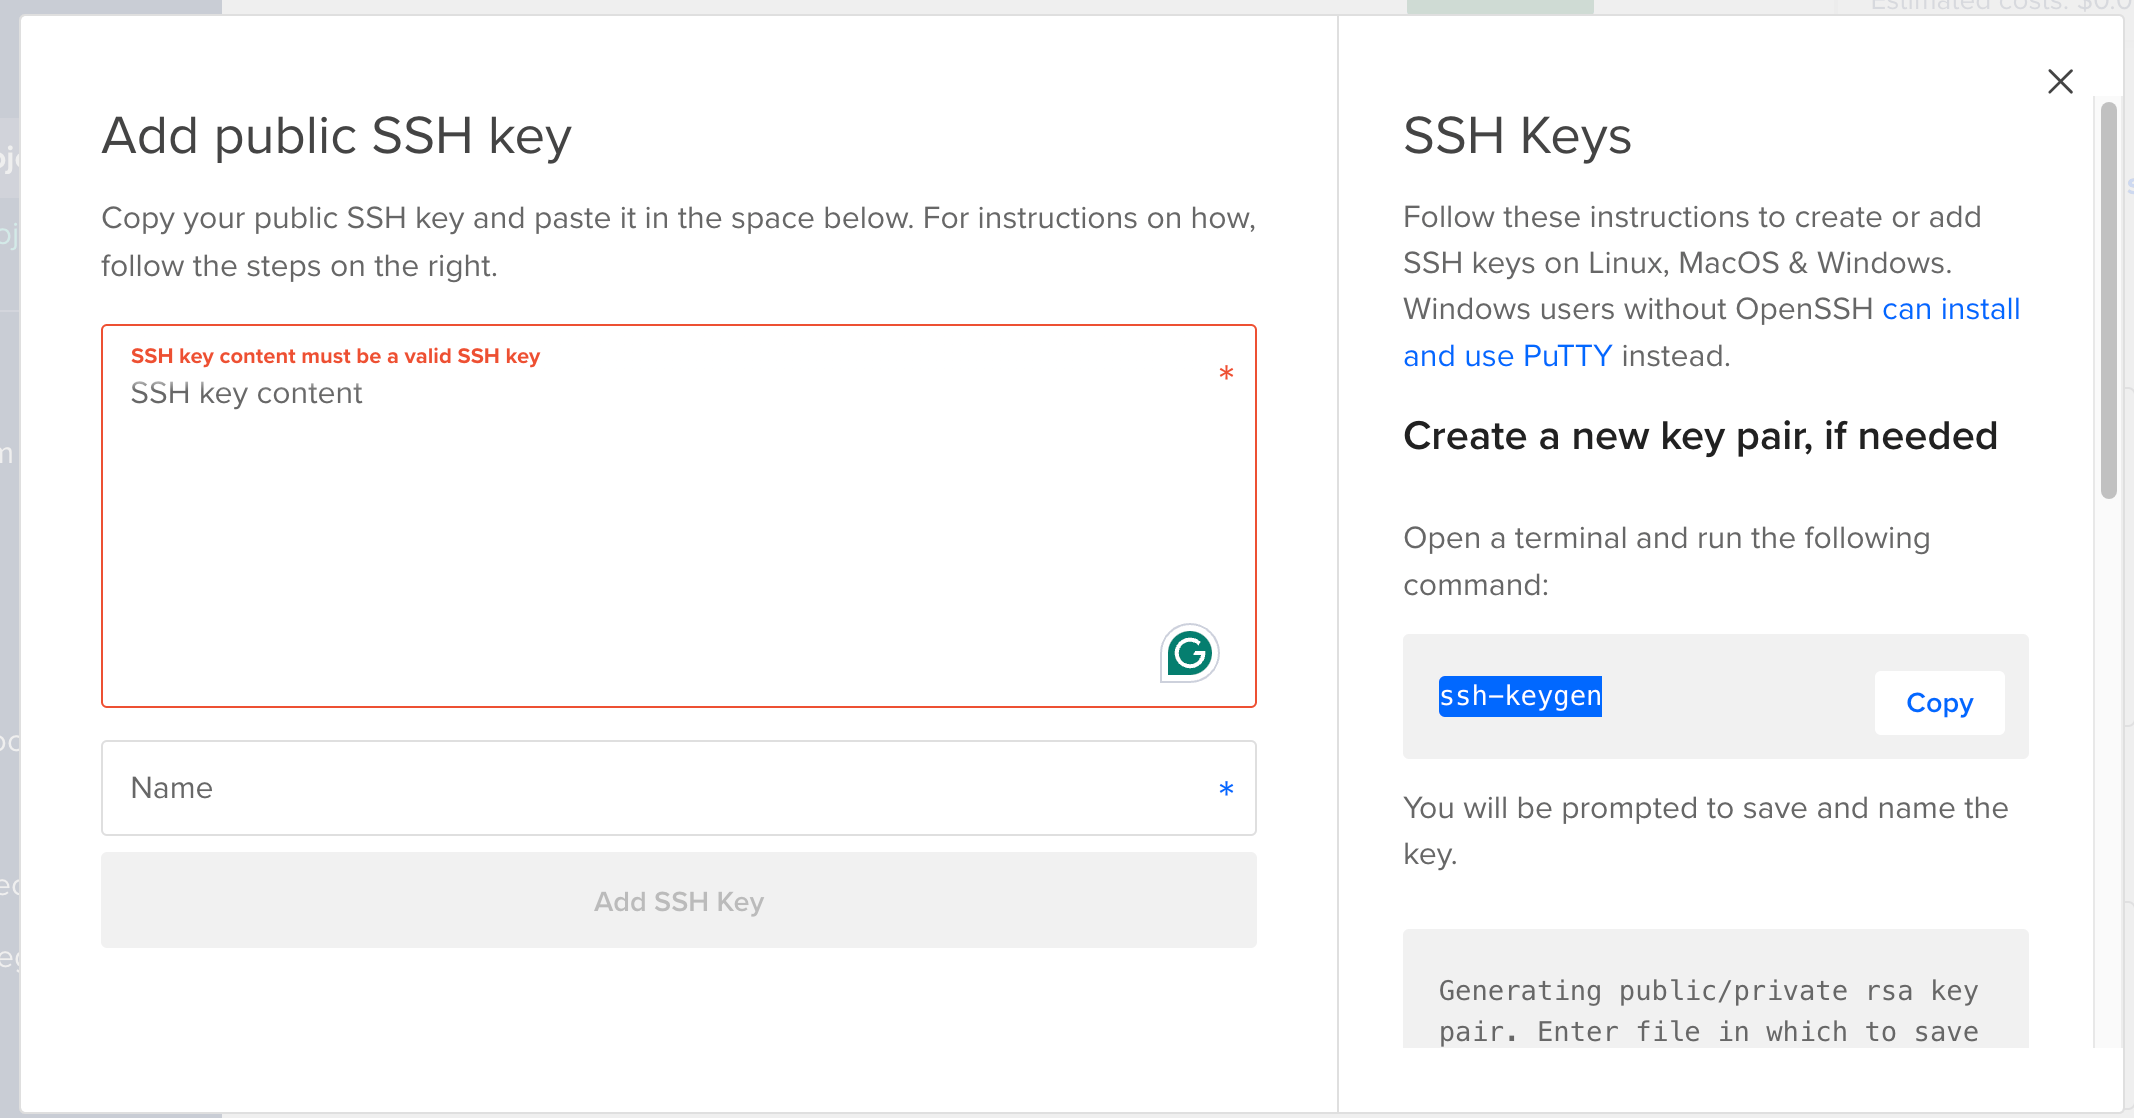
If you haven’t already added your devices' SSH keys to Digital Ocean, be sure to do that before creating the droplet. This enables you to log in via SSH on the command line.
If you have a new system, you must run the SSH key generator command.
ssh-keygen
Assuming you've done this already, you can copy your current public key like I did.
cat ~/.ssh/id_ed25519.pub
# or
cat ~/.ssh/id_rsa.pub
Copy what returns and enter it in the field shown here:
With that out of the way, we can create a droplet.
Click the “Create Droplet” button, which should take you to your list of droplets if you already have any. I clicked through to this specific droplet, ready to rock and roll.
We’ll want access to the Digital Ocean droplet environment we created via SSH to make our lives easier. My machine is configured to use this based on what was checked when we created the droplet.
Find the ipv4 line and copy it to your clipboard. You can SSH into your server like the following (I removed my server IP for clarity sake)
ssh root@<your.server.ip.address>
This might return something like the following:
ssh [email protected]
The authenticity of host 'xxx.xx.xxx.xxx (xxx.xx.xxx.xxx)' can't be established.
xxxxxx key fingerprint is SHA256:xxxxxxxxxxxxxxxxxxxxxxxxxxxxx.
This key is not known by any other names.
Are you sure you want to continue connecting (yes/no/[fingerprint])? y
Please type 'yes', 'no' or the fingerprint: yes
Warning: Permanently added 'xxx.xx.xxx.xxx' (XXXXXXX) to the list of known hosts.
Type yes when it prompts you.
In my app’s case, I get additional logs:
Welcome to Ubuntu 22.04.2 LTS (GNU/Linux 5.15.0-73-generic x86_64)

 * Documentation:  https://help.ubuntu.com
 * Management:     https://landscape.canonical.com
 * Support:        https://ubuntu.com/advantage

  System information as of Tue Dec 12 17:34:24 UTC 2023

  System load:  0.0                Users logged in:          0
  Usage of /:   22.9% of 24.05GB   IPv4 address for docker0: xxx.xx.x.x
  Memory usage: 27%                IPv4 address for eth0:    xxx.xx.xxx.xxx
  Swap usage:   0%                 IPv4 address for eth0:    xx.xx.x.x
  Processes:    97                 IPv4 address for eth1:    xx.xxx.x.xxx

Expanded Security Maintenance for Applications is not enabled.

164 updates can be applied immediately.
82 of these updates are standard security updates.
To see these additional updates run: apt list --upgradable

Enable ESM Apps to receive additional future security updates.
See https://ubuntu.com/esm or run: sudo pro status


 ! Setup a user's ssh key for deployment by passing in the public ssh key as shown:

     echo 'CONTENTS_OF_ID_RSA_PUB_FILE' | dokku ssh-keys:add admin

********************************************************************************

Welcome to DigitalOcean's 1-Click Dokku Droplet.
To keep this Droplet secure, the UFW firewall is enabled.
All ports are BLOCKED except 22 (SSH), 80 (HTTP), 443 (HTTPS),
2375 (Docker) and 2376 (Docker).

In a web browser, you can view:
 * The Dokku 1-Click Quickstart guide: https://do.co/3nzKhrp#start
 * Your Dokku setup page: http://xxx.xx.xxx.xxx

For help and more information, visit https://do.co/3nzKhrp
********************************************************************************
To delete this message of the day: rm -rf /etc/update-motd.d/99-one-click
root@dokku-fun:~#
Add your SSH keys
To deploy to your Dokku server, you must add your public SSH keys to the Dokku key list. You can create a new file on your Dokku host and copy your public key.
On your local machine, exit the current SSH session and type.
cat ~/.ssh/id_rsa.pub
That should print your current public SSH key. Copy what returns and add your newly created public SSH key to the Dokku key list on the remote server:
echo "$CONTENTS_OF_YOUR_PUBLIC_SSH_KEY_HERE" | ssh@<YOUR SERVER IP> dokku ssh-keys:add PUBLIC_KEY
I called my key PUBLIC_KEY.
Create a new app via Dokku
With that out of the way, we’ve successfully installed and configured Dokku on a remote machine via Digital Ocean. Next, we can create the app in the remote environment to match the one we set up earlier.
# on the Dokku host via Digital Ocean SSH
dokku apps:create dokku-demo
dokku apps:create dokku-demo
-----> Creating dokku-demo...
-----> Creating new app virtual host file...
One gotcha you might run into is naming the app on the remote server. Underscores, for whatever reason, don’t jive well, so avoid them.
root@dokku-fun:~# dokku apps:create dokku_demo
 !     App name must begin with lowercase alphanumeric character, and cannot include uppercase characters, colons, or underscores
Databases
Dokku doesn’t provide datastores by default so we need to install those independently.
I prefer PostgreSQL on my apps (mostly because It’s what I’ve always used).
# on the Dokku host via Digital Ocean SSH
sudo dokku plugin:install https://github.com/dokku/dokku-postgres.git
This should fetch a number of dependencies and install PostgreSQL. Next, we must create a service that leverages that specific data store.
dokku postgres:create dokkudb
Finally, with that service created, we need to link back to the app we made previously.
dokku postgres:link dokkudb dokku-demo
I realize the names are confusing (sorry!), but on the left side, the following postgres:link should be your database name, and on the right should be your app.
dokku postgres:link <database name> <dokku app name>
This should set the environment variable called DATABASE_URL and point to the database we just created.
Additional Dokku plugins
Dokku is built out of a collection of plugins, so it makes sense that there are many others to leverage in your apps. Check out the complete list here: https://dokku.com/docs/community/plugins/#official-plugins-beta
Local app configuration
With the remote portion semi-setup, we must configure our app locally to respond to the database changes.
I’ll run a handy command to change our database setup from SQLite to PostgreSQL locally. This amends our database.yml file and installs the pg gem.
rails db:system:change --to=postgresql
    conflict  config/database.yml
Overwrite /path/to/dokku_demo/config/database.yml? (enter "h" for help) [Ynaqdhm] y
       force  config/database.yml
        gsub  Gemfile
        gsub  Gemfile
        gsub  Dockerfile
        gsub  Dockerfile
Inside the database.yml file, we’ll need to change the production environment to match the name we gave the PostSQL service we made on the remote server.
# PostgreSQL. Versions 9.3 and up are supported.
#
# Install the pg driver:
#   gem install pg
# On macOS with Homebrew:
#   gem install pg -- --with-pg-config=/usr/local/bin/pg_config
# On Windows:
#   gem install pg
#       Choose the win32 build.
#       Install PostgreSQL and put its /bin directory on your path.
#
# Configure Using Gemfile
# gem "pg"
#
default: &default
  adapter: postgresql
  encoding: unicode
  # For details on connection pooling, see Rails configuration guide
  # https://guides.rubyonrails.org/configuring.html#database-pooling
  pool: <%= ENV.fetch("RAILS_MAX_THREADS") { 5 } %>

development:
  <<: *default
  database: dokku_demo_development

  # The specified database role being used to connect to PostgreSQL.
  # To create additional roles in PostgreSQL see `$ createuser --help`.
  # When left blank, PostgreSQL will use the default role. This is
  # the same name as the operating system user running Rails.
  #username: dokku_demo

  # The password associated with the PostgreSQL role (username).
  #password:

  # Connect on a TCP socket. Omitted by default since the client uses a
  # domain socket that doesn't need configuration. Windows does not have
  # domain sockets, so uncomment these lines.
  #host: localhost

  # The TCP port the server listens on. Defaults to 5432.
  # If your server runs on a different port number, change accordingly.
  #port: 5432

  # Schema search path. The server defaults to $user,public
  #schema_search_path: myapp,sharedapp,public

  # Minimum log levels, in increasing order:
  #   debug5, debug4, debug3, debug2, debug1,
  #   log, notice, warning, error, fatal, and panic
  # Defaults to warning.
  #min_messages: notice

# Warning: The database defined as "test" will be erased and
# re-generated from your development database when you run "rake".
# Do not set this db to the same as development or production.
test:
  <<: *default
  database: dokku_demo_test

# As with config/credentials.yml, you never want to store sensitive information,
# like your database password, in your source code. If your source code is
# ever seen by anyone, they now have access to your database.
#
# Instead, provide the password or a full connection URL as an environment
# variable when you boot the app. For example:
#
#   DATABASE_URL="postgres://myuser:mypass@localhost/somedatabase"
#
# If the connection URL is provided in the special DATABASE_URL environment
# variable, Rails will automatically merge its configuration values on top of
# the values provided in this file. Alternatively, you can specify a connection
# URL environment variable explicitly:
#
#   production:
#     url: <%= ENV["MY_APP_DATABASE_URL"] %>
#
# Read https://guides.rubyonrails.org/configuring.html#configuring-a-database
# for a full overview on how database connection configuration can be specified.
#
production:
  <<: *default
  database: dokkudb
  username: dokkudb
  password: <%= ENV["DATABASE_URL"] %>
I modified the production section database and password to include the new database name and username (same as the database name). The password is the database URL variable set with Dokku in the previous step.
Define a new git origin
To push and deploy changes, we’ll need to leverage a new git remote origin. This lets us effectively deploy on demand, which is a huge perk and similar to Heroku if you’ve used that before.
In most cases, you would have an origin remote to have a place to version your code, and the dokku origin would be our live environment.
Let’s commit our changes locally first:
git add .
git commit -m "Update database settings"
Next, add the new remote to your app. My app’s name is dokku-demo.
git remote add dokku dokku@<YOUR SERVER IP>:dokku-demo
Then, you can push your changes live and deploy the app to the new remote.
git push dokku main
With any luck, you’ll see some logs appear, which gives us a good indication that the app is deploying! However, the first deployment could take some time to kick out.
Handling Deployment Errors
I got some errors on my first deployment. It seems there’s a bundler mismatch, so we can try to resolve it by doing the following:
Bundler errors
Update Bundler: Update to the correct Bundler version (2.4.10) on your local machine and run bundle install:
gem install bundler -v '2.4.10'
bundle install
Commit the Updated Gemfile.lock: After running bundle install, you should have an updated Gemfile.lock. Commit this to your repository:
git add Gemfile.lock
git commit -m "Update Gemfile.lock"
Push Again: Push the changes to your Dokku server:
git push dokku main
PostgreSQL Errors
The latest Rails version shipping with a Dockerfile presents some issues with Dokku. To resolve the problem, I renamed the file from Dockerfile to .Dockerfile.
Add a Procfile for production
We have a Procfile.dev file but also need one in production. For this basic app, we need to run the Rails server. You might later add a queuing service like Sidekiq or some form of service. Also, note the release line. It will handle running rails db:migrate for each deployment.
Create a file in your app's' Procfile' root directory and add the following.
web: bin/rails server
release: rails db:migrate
Commit your changes with git and re-deploy once more.
git add Procfile
git commit -m "Add Procfile"
git push dokku main
Success!
Previewing the app
I’d rather not buy a domain to preview the app on the server, so after deploying, we are faced with the challenge of visiting the IP address directly and hoping the Rails app responds. This involved some trial and error on my part, given that, for whatever reason, Dokku runs on port 5000.
A gotcha: I finally stumbled on the configuration of forcing SSL in config/environments/production.rb. Disabling this temporarily allows you to visit the app without the https:// prefix and directly on the public IP address. If you were to enable SSL and proceed with configuring a domain, this would probably resolve the issue.
# Force all access to the app over SSL, use Strict-Transport-Security, and use secure cookies.
  config.force_ssl = false
On top of this issue, I (for some reason) needed to remove a default file from etc/ngnix/sites-enabled. I don't know why this was the case, but some Googling helped me arrive at this resolution.
SSH into your server and then cd up a couple of levels
ssh root@<SERVERIP>

cd ../
cd ../

cd etc/nginx/sites-enabled
rm -rf default
Again, for some reason, removing the default kicks things in the right direction. After removing that file we need to reboot the app once by running:
dokku ps:restart dokku-demo
Viewing logs
You can optionally view your app's logs by running the following:
dokku logs dokku-demo --tail
Final thoughts and opinions
With all those bugs out of the way, I will say it was a chore to get an app from my local machine to a remote server, but for $8/mo, that’s probably an equal trade-off. I'm not versed in server configuration, so my opinion is biased.
Dokku is like a lightweight Heroku with a premium GUI version. It’s a great tool to have in your toolbox and an excellent exercise for getting familiar with maintaining servers. I learned much more about both Dokku and Digital Ocean stumbling my way through this process, but I can't say it was super positive.
If you need something lean to put out there, those comfortable with SSH, command-line work, and endless plugin configuration will like it. While I prefer complete control, handing something like this off to a more sophisticated PAAS for a bit more cost is worth the extra money.
Hopefully, this will be helpful if you decide to take a run at trying Dokku out!
I'm hoping to attempt this with more services soon. There is a growing list out there, which is exciting to see.
Categories
Collection
Part of the Ruby on Rails collection
