
March 22, 2021
•Last updated November 5, 2023
7 Git Commands You Might Not Know
Almost every software developer today knows at least a little bit about Git. In order to go beyond this "little bit", I'd like to show you seven short commands which you might not know - and which might help you become more productive and proficient with Git!
Using "git switch" Instead of "git checkout"
Noticing that "git checkout" has so many different jobs and meanings, the Git community recently published a new command to lighten its workload: the "git switch" command allows you to... well... switch branches!
$ git switch develop
Its usage is, as you can see, very simple and similar to how you would use "git checkout". But unlike the "checkout" command, "switch" doesn't have 1,000 other responsibilities.
Since it's quite a new member of the Git command family, you'll have to make sure your Git installation is up to date in order to use "git switch".
Switch Back to the Previous Branch
If you often have to switch back and forth between two branches, the following shortcut might come in handy for you:
$ git switch -
With the dash character as its only parameter, "git switch" will check out the branch that was previously active. Very handy, as said, to go back and forth between two branches!
Undoing Local Changes with "git restore"
If you wanted to undo local changes, you had to use some form of "git checkout" or "git reset" - until recently! Another relatively new command is "git restore" that was made for exactly this purpose (in contrast to "checkout" and "reset", which have plenty of other jobs).
Here's an overview of the most important use cases with "git restore":
# To undo your local changes in a certain file...
$ git restore my-file.txt

# To unstage a file, but leave its actual changes untouched...
$ git restore --staged my-file.txt

# To undo all of the local changes in your working copy (be careful!)...
$ git restore .
Making "git status" More Concise
The default output of "git status" contains quite a bit of stuffing:
$ git status
On branch main
Your branch is behind 'origin/main' by 1 commit, and can be fast-forwarded.
  (use "git pull" to update your local branch)

  Changes not staged for commit:
    (use "git add/rm <file>..." to update what will be committed)
    (use "git restore <file>..." to discard changes in working directory)
      modified:   about.html
      deleted:    error.html

  Untracked files:
    (use "git add <file>..." to include in what will be committed)
      product.html

  no changes added to commit (use "git add" and/or "git commit -a")
Don't get me wrong: this is great for beginners! But once you're a bit more experienced with Git, a leaner output could be nice. The way to achieve this is by creating a custom alias like this:
$ git config --global alias.st "status --short --branch"
Now, your status output will be much more concise when you enter your new "git st" command:
$ git st
## main...origin/main [behind 1]
 M about.html
 D error.html
 ?? product.html
In case you'd like to make any modifications to your alias at a later time, you'll find it in your global Git config (in ~/.gitconfig).
Using the Reflog to Save Your Neck
Although it can be tremendously helpful, the "Reflog" is a rather little-known feature in Git. In a nutshell, the Reflog is Git's "diary" where it protocols all of the HEAD pointer movements that happened in your local repository. This means that every time you commit, merge, cherry-pick, rebase, reset, ... Git takes note of this in this special journal. With all of the most important actions nicely protocoled, the Reflog is the perfect safety net when you've done something horrible.
Let's look at a simple example and say you have just performed a "reset". This means you rolled back your commit history a couple of commits - thereby "deleting" those newer commits. Let's also say that this wasn't your best move and you desperately want those commits back!
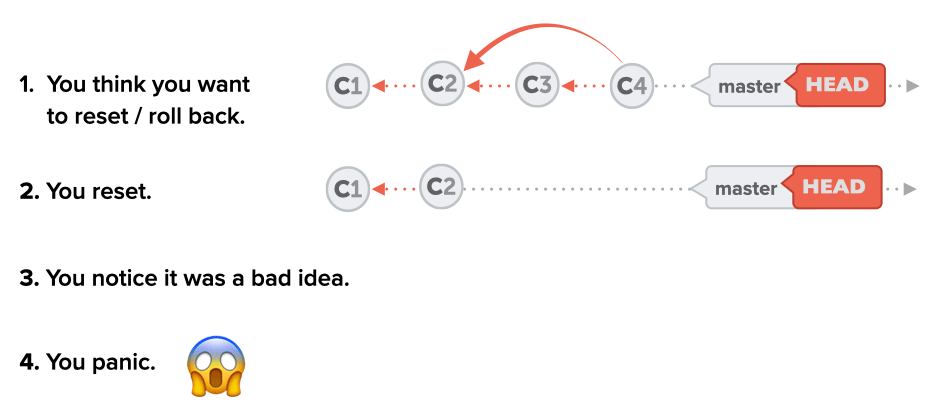
This is where the Reflog comes in handy!
In this example, the Reflog had correctly logged the bad reset we had performed earlier. Undoing this, then, was as simple as going back to the previous revision - which was also protocoled! I used "git reset" again to bring the old state back - but you could also use "git branch" if you prefer to have it in a separate branch.
Staging Parts of a File for the Next Commit
There's a golden rule in version control: "Only include changes in the same commit if they really belong to the same topic!" The alternative to this approach is to just cram every change you've produced in the last few days into a single, bloated commit.
While the former will give you a nice, easy to understand documentation of the changes in your project, the latter will wreak havoc.
But going with the clean approach of only bundling changes from the same topic in one commit is not always easy: often, you have changes for multiple topics in one and the same file! A simple "git add my-file.txt" wouldn't help, because it would just add all of the changes into the next commit.
Luckily, there's a helpful option for "git add": using the "-p" flag, Git will take you by the hand and step through every chunk of changes in this file; and you can decide if you want to add that part of your changes to the next commit or not!
Here's how this works on the command line:
And here's how it looks like in a Git desktop client like Tower:
In the above video, you've seen that you can go even further: if chunks of changes aren't precise enough for you, you can decide on the level of individual lines if you want to stage (or even discard) them.
Working in such a granular way with your changes will result in a much cleaner, clearer code base!
Saving Parts of a File on the Stash
Selecting individual changes on a chunk or line level isn't reduced to "git add". You can also use this same technique to only save parts of your changes in a file on the Stash. (Reminder: the "Stash" in Git works like a clipboard for uncommitted local changes. Read this little tutorial if you want to learn more about how the Stash works.)
So instead of putting all of your current local changes on a Stash, you can carefully select them using the following command:
$ git stash -p myFile.txt
Don't Stop at the Basics!
Very often, I hear developers claim "they have already mastered Git". But in reality, they often stopped at the basics and never came past commit, push, and pull. But Git has so much more to offer! 💪 It has so much power under the hood which you can use to produce better code - and ultimately become a better developer!
If you want to dive deeper, check out some of the following free resources:
- The First Aid Kit for Git: Learn how to undo and recover from mistakes in Git with a series of very short and simple videos.
- The Git Cheat Sheet: A popular cheat sheet to always have the most important commands at hand.
About the Author
Tobias Günther is the Co-Founder of Tower, the popular Git desktop client that helps more than 100,000 developers around the world to be more productive with Git.
Categories
